At that point I realized I kept sharing long messy links that did not look good and were hard to track, so I decided to build my own using Laravel.
What makes this project useful is not just the final result. It shows how different parts of Laravel work together in a real situation. You deal with database structure routes controllers and user data all in one place.
In this tutorial we will build a simple version step by step. It will take a long URL generate a short one track clicks and display everything in a dashboard.
What You Will Build
A working URL shortener with user login link creation and click tracking that you can run locally or deploy.
1. Start with a fresh Laravel project
Open your terminal and create a new project. Make sure your PHP version is up to date.
If you don’t have Laravel installed yet, you can follow this step by step tutorial to set up Laravel using XAMPP before continuing.
composer create-project laravel/laravel short-app "13.*"
cd short-app
php artisan serve
Open the project in your browser. If you see the default Laravel page you are ready to move on.
2. Set up the database
Open the .env file and connect your database. After that create a migration for storing links.
php artisan make:migration create_links_table
Edit the migration file:
Schema::create('links', function (Blueprint $table) {
  $table->id();
  $table->string('original_url');
  $table->string('short_code')->unique();
  $table->integer('clicks')->default(0);
  $table->timestamps();
});
Run it:
php artisan migrate
3. Create the model
Now create a model for your links.
php artisan make:model Link
Inside the model allow mass assignment:
protected $fillable = ['original_url', 'short_code', 'clicks'];
This lets you store data without issues.
4. Generate short codes
We need a simple way to generate unique codes. Add this logic in your controller later or in a helper.
use Illuminate\Support\Str;

$code = Str::random(6);
In real usage you should check if the code already exists. If it does just generate another one.
5. Create controller and routes
Generate a controller:
php artisan make:controller LinkController
Add routes in web.php:
Route::get('/', [LinkController::class, 'index']);
Route::post('/shorten', [LinkController::class, 'store']);
Route::get('/{code}', [LinkController::class, 'redirect']);
The store method will save links. The redirect method will handle clicks.
6. Store and redirect logic
In your controller add basic logic:
public function store(Request $request)
{
  $code = Str::random(6);

  $link = Link::create([
    'original_url' => $request->url,
    'short_code' => $code
  ]);

  return back()->with('short', url('/' . $code));
}

public function redirect($code)
{
  $link = Link::where('short_code', $code)->firstOrFail();
  $link->increment('clicks');

  return redirect($link->original_url);
}
This is the core of the app. Small but powerful.
7. Create a simple frontend
Now build a basic form using Blade.
<form method="POST" action="/shorten">
  <input type="text" name="url" placeholder="Paste URL">
  <button>Shorten</button>
</form>
After submitting show the result:
@if(session('short'))
  <p>{{ session('short') }}</p>
@endif
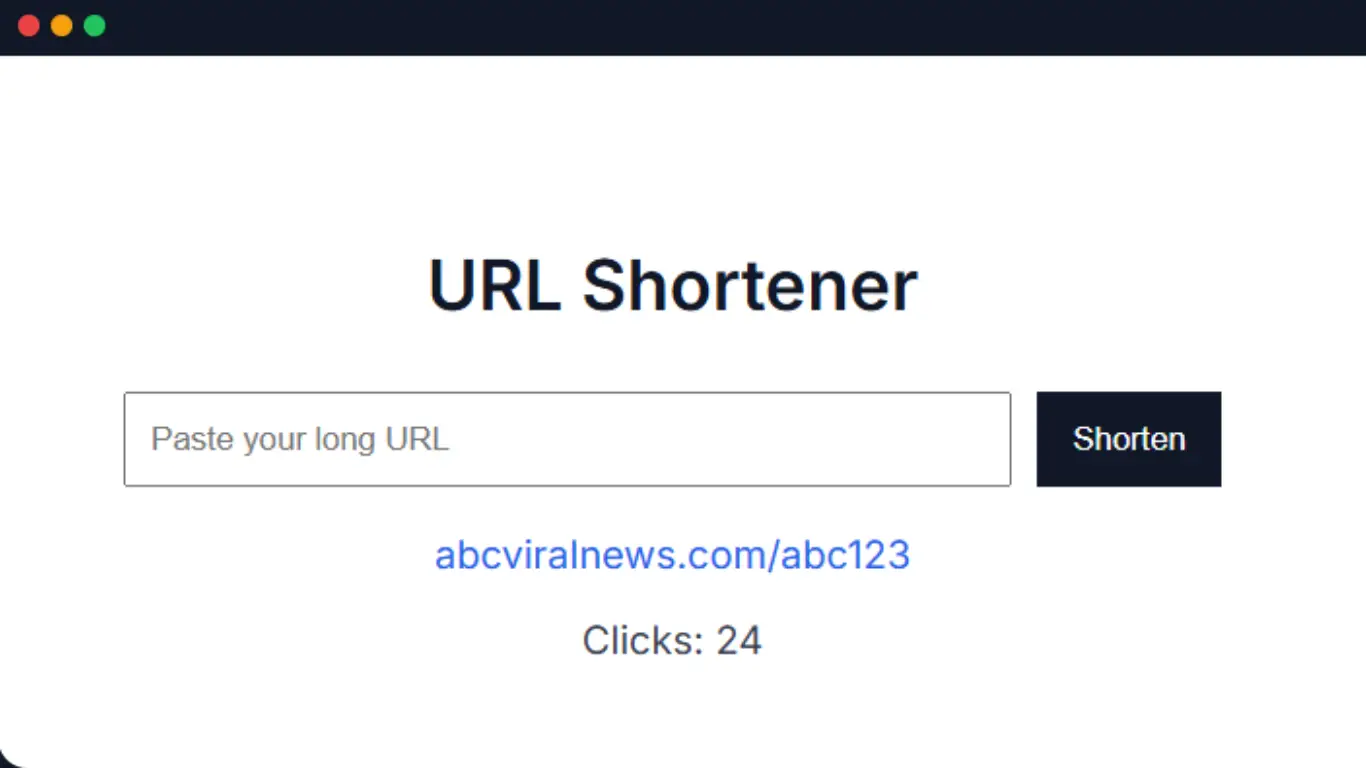
8. Live Demo Preview
Here is how your app should feel visually. This is a simple preview of the interface.
URL Shortener
This is not complex but it shows the full flow, input, result and stats.
9. Test the flow
Try creating links. Open them in a new tab. Refresh the dashboard. Watch the click count change. This is where everything connects.
If something does not work check step by step. Database routes controller. Keep it simple.
10. Improve it later
Once the base works you can extend it. Add login system. Add user dashboard. Add copy button. Even analytics.
You do not need everything at once. Build small features one by one.
“Small working apps teach more than big unfinished ones.”
After finishing this you will understand how Laravel flows from request to response. That knowledge is more valuable than just copying code.